Skip to content
English
On this page

Visual Testing

The visual quality of an application creates the first impression on the customers. When the look and feel are palatable, they tend to explore the application further. Imagine a customer has to pay online, and the ‘Continue’ button looks as in Figure 5-1. Do you think they will have the trust to proceed further? I very much doubt it. I would choose a competitor’s website to get my job done rather than risk losing my money.

Frameworks

With businesses spending a lot on strategies to acquire more customers through advertisements, freebies, campaigns, and more, software teams missing to focus on visual quality is equivalent to building a luxurious house and forgetting to paint it. So, a critical factor that takes the business closer to the customer and gets their affinity is the application’s visual quality, and the customer’s affinity directly amplifies the brand value. Visual testing is all about ensuring whether the application’s visual quality is intact using both manual & automated testing methods.

Visual testing refers to confirming whether the application sticks to the expected appearance as per the design in terms of every elements’ size, color, the relative positioning of elements, and similar visual attributes across devices and browsers. This chapter will give a compact overview ofvisual testing with focus on mandatory project/business specific use cases along with practical exercises using tools like Cypress and BackstopJS. A peek into the new AI-powered visual automated testing tool, Applitools Eyes, is included as well. With this chapter, you will also apprehend the front-end testing landscape holistically and understand how the different front-end testing types apart from visual testing cumulatively contribute to the application’s visual quality.

Introduction to Visual Testing

Many software development teams, even today, majorly rely on manual eyeballing and UI-driven automated testing to verify the visual quality of the application. Though this may be sufficient for some applications, it is essential to understand the tradeoffs associated with the approach.

First of all, we should agree that human eyes can’t notice pixel-level changes, and we can only achieve a certain level of precision with manual eyeballing. For example, it is pretty easy to miss out on the curved edges of buttons, or the logo is shifted up/down by a few pixels. In fact, a research study in 2012 found that changes up to a fifth of an image area could regularly go unnoticed by us. 1 This is termed as ‘Change Blindness.’ It has nothing to do with defects in our vision—it’s purely psychological. So, you can imagine how small changes on the application could go unnoticed every day in manual testing. Also, let’s not forget the time and effort needed to manually test the visual quality of the application on a sheer multitude of browsers, devices, and screen resolution combinations. So, clearly, we need some automation here.

But when coming to automated UI-driven functional tests, though they partially contribute to validating the visual quality, it may not be enough as they do not check the ‘look and feel’ of the elements as they identify an element by its locator such as an ID or XPath and check if it behaves functionally as expected. For example, the UI-driven tests for Figure 5-1 would have passed because the ‘Continue’ button existed as per its locator with an expected label, and on clicking, it would have taken the user to the next page successfully. You can’t blame the test, as they are meant to validate the end-to-end functional user flow, and it stands true to its purpose. Another caveat with using UI-driven functional tests for visual testing is that you can’t add tests to assert the presence of every element on every page of the entire application, which would make their execution much slower and add a lot of maintenance effort.

To break free from these challenges, we now have mature automated visual testing tools, just like functional test automation tools. Indeed these tools have existed for a while and adopted various methodologies to perform visual testing and become stabler and easier over time. The following are some of the techniques the existing tools adopt to perform visual testing:

  • By requiring us to write code to verify the CSS aspects of the elements, i.e., a test to verify if border size equals 10px.

  • By analyzing static CSS code to find browser incompatibility issues of the UI elements.

  • By taking a screenshot of the page and comparing it pixel by pixel against an expected base screenshot.

  • By using AI to recognize changes on the page, just like human eyes.

Although, today, visual regression testing majorly refers to the method of comparing the application’s screenshot pixel by pixel against a base screenshot. It is sometimes referred to as screenshot testing due to the same reason. A couple of open-source tools that do this kind of visual testing are PhantomJS and BackstopJS. There are paid tools as well, such as ApplitoolsEyes and Functionize, which are AI-powered. So, after a manual comparison of the application against the UX design, you can use such tools to automate visual testing to help you catch visual bugs. Over the course of iterative development, just like how functional tests help you catch functional bugs, visual tests will give you continuous feedback on the application’s visual quality.

An important point to note with automated visual tests is that they can become flaky in an iterative development process when you don’t add them at the right stage. For example, suppose your team has decided to play the login functionality as part of two user stories: one where the bare-bone functionality is laid out and the second to finesse the functionality and look and feel. Although adding UI-driven functional tests as part of these two user stories makes sense, adding visual tests as part of the first story might not add value. So, as part of iteration planning, include visual testing efforts clearly in the respective user stories.

Project / Business Critical Use Cases

We discussed why adding automated visual tests has become important, but it may not be a mandatory requirement for all applications for no reason other than cost! In any project, first, there is the cost of developing and maintaining the UI-driven functional tests, which is an absolute need for all applications. In addition to this, we have the cost of developing and maintaining the visual tests — even after the two types of tests can be combined into a single test suite. So take the cue from the nature of your application to decide if automated visual testing is a must-have or nice-to- have. For example, let’s say only a couple of admins use an internal application, then you don’t have to spend effort on creating automated visual tests and manual visual testing is quite adequate. However, there are a few use cases such as the following where automated visual testing may give you more value than the bucks spent:

  • When you are developing a B2C (Business to Customers) application, the visual quality will become a critical qualityattribute and thereby, you need continuous feedback on the visual quality during development. For example, while developing a global website like Amazon that has so many components on a page, you need continuous feedback on visual quality just like receiving feedback on functionality using UI-driven tests. So, unless you’re just developing a rapid prototype to assess the market needs and plan to rework your application’s design later, visual tests will help you build a stable application.

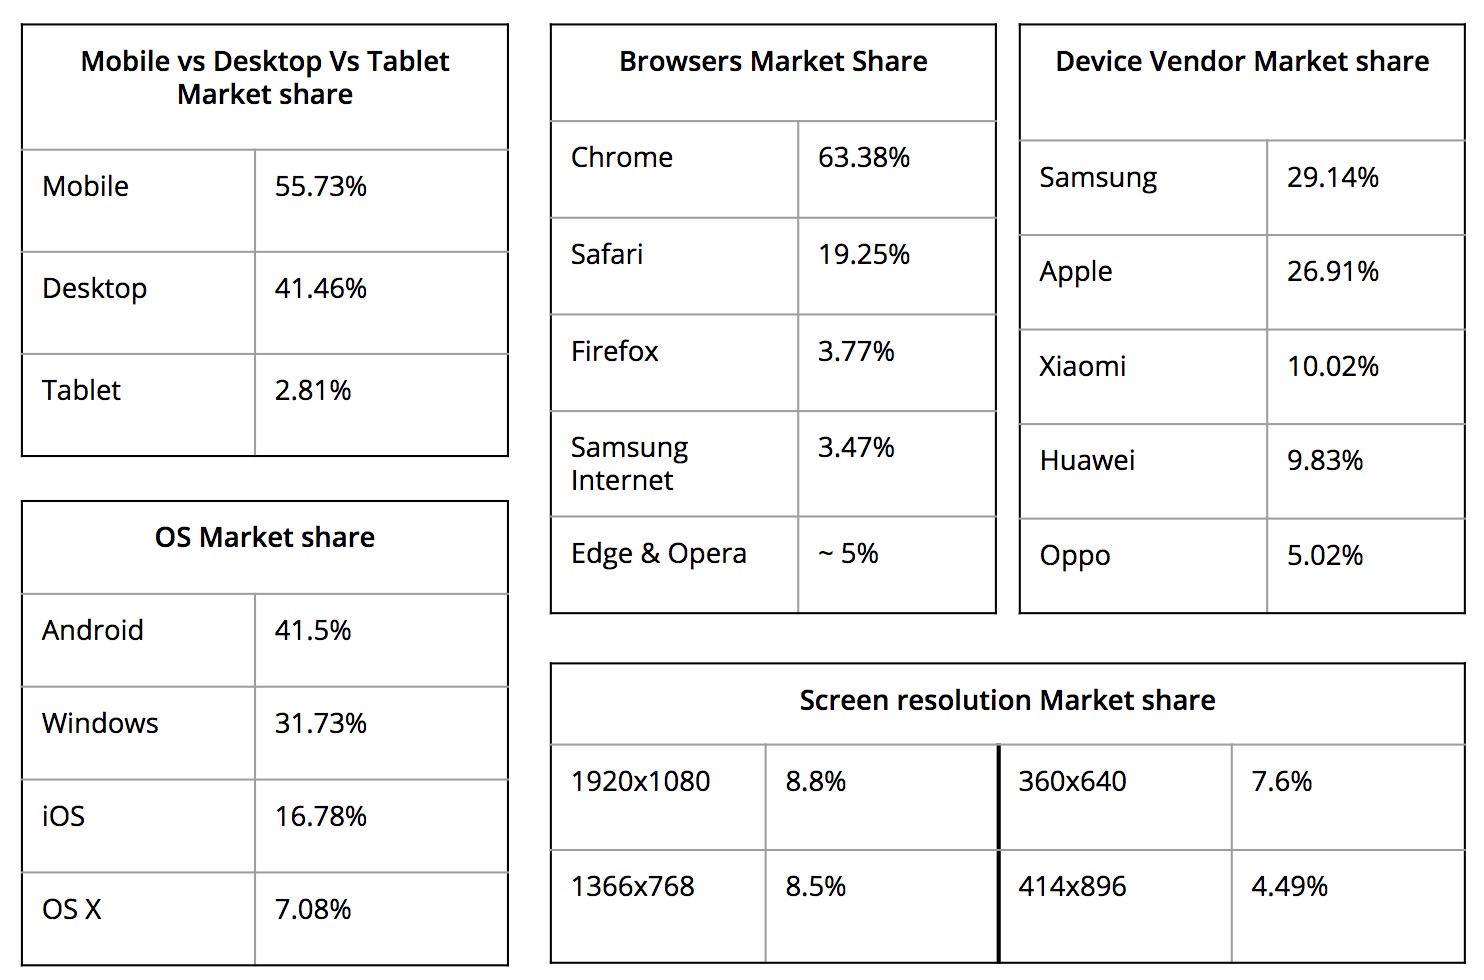
  • When you have to support your application across major browsers, devices, and screen resolutions (e.g., Amazon again), automated visual tests will help you with the massive load of regression testing. Figure 5-2 shows web usage statistics across devices, browsers, manufacturers, OSes, and screen resolutions as of 2020, according to gs.statcounter.com

Frameworks

From the figure, you can observe that there is almost an equal share of mobile and desktop users. Chrome takes a significant share among the browsers, and Safari follows with ~20% global users. You can also see that Android, Windows, and iOS are substantial players. Testing the visual quality across these combinations will become a 24/7 job, and automated visual testing will save significant efforts for your team.

  • Usually, the enterprises that own a suite of applications have a centralized team that develops the UI components, and multiple teams reuse these components — often referred to as design systems. For example, UI components like header navigation panels with ‘FAQs,’ ‘Contact us,’ ‘Share to Social Media’ will be developed by a single team and reused across their suite of applications. Visual testing at the component level becomes inevitable in those cases, as any flaw in these standard components will percolate to the entire suite.

  • Sometimes, the application is rebuilt completely to improve scalability and other quality aspects. Still, the expectation will be to keep the user experience as-is since the customers have gotten familiar with it. Writing visual tests will serve as safety nets for the teams in such a scenario.

  • Similarly, visual tests will come in handy when you do significant refactoring of the existing application — for example, improving the front-end performance will require considerable reorganization of UI components. Visual tests will give the team great confidence then.

  • When the application is scaled to many newer countries, localization features such as different look and feel per region and native language text get incorporated. In such situations, a person or team can’t remember the look and feel of each variation. Also, some of the language text, such as German, tends to be long andmight slightly change the page layout sometimes. Visual testing will immensely help in such cases.

So, consider the factors like customer impact, type of work, team’s confidence, and manual testing efforts while deciding if your application needs automated visual testing. If required, try to balance your front-end testing strategy with minimal visual tests for the most critical flows.

Front-End Testing Strategy

Automated visual testing can yield the right benefits when balanced proportionally with other front-end testing types. So, understanding the different pieces of the front-end testing jigsaw puzzle will enable you to carve the proper boundaries to each of them as required by your application. You’ll also notice that some of the front-end testing types contribute to visual testing partially in their own regard. Therefore, you can use their inherent nature to appropriately strategize the overall visual testing efforts for your application as well. It is also crucial to understand where and how the automated visual tests fit in so that teams don’t propose them as a solution to other unrelated problems. For example, obviously, you don’t have to add visual tests for every kind of error message that appears on the page — that’s UI unit tests’ job. So, let’s zoom in to look at the overall front-end testing strategy.

The web application’s front-end code comprises three major parts — the HTML code that defines the basic page structure, the CSS code that styles the elements on the page, and the scripts that dictate the behavior of those elements.

Another significant component is the browser that renders this code. Most of the newer browsers follow standards for rendering elements. As a result, the front-end development frameworks can provide inbuilt support for various browsers. In other words, the elements built using these frameworks are guaranteed to render correctly in the major browsers. So, we might haveto check for cross-browser compatibility issues whenever we use new features that are not tested across old and new browsers by the framework.

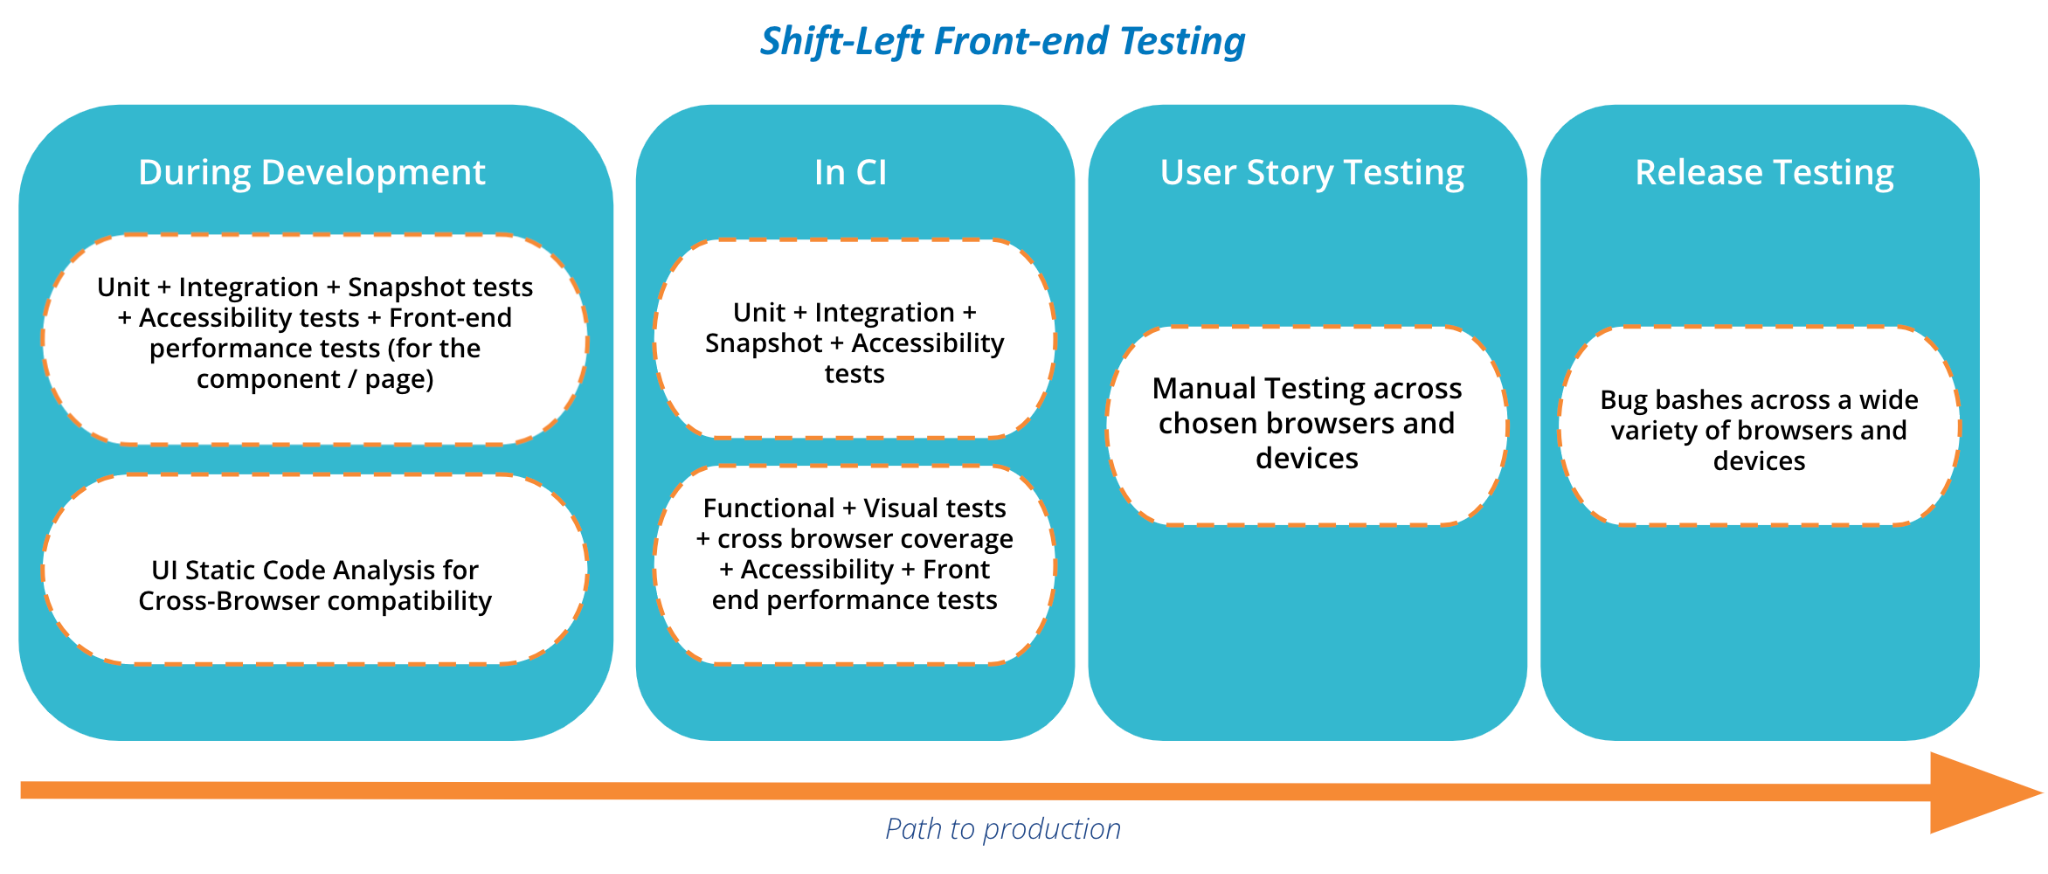
To validate these different parts of the front-end code, we have various types of micro and macro level front-end tests similar to the backend. It is usual practice in teams for the developers and testers to own it collectively. Figure 5-3 shows how the different micro and macro level front-end tests can be engaged throughout the development process to get faster feedback. In other words, the figure throws light on shift-left front-end testing implementation. Although we have discussed the basics of some of these tests types in Chapter 3, let’s understand the fitment of these tests from the front-end code perspective and their little contribution to visual testing.

Frameworks

Unit Tests

Front-end unit tests are written at a component level to assert their behavior in different states. They also partially contribute to visual testing. For example, unit tests assert the greeting message in the title component or the disabled and enabled state of a submit button. Typically, the developers write this when they start with development using tools like Jest, react- testing-library, etc. They reside inside the development codebase and are helpful to provide faster feedback during the development stage itself. Example 5-1 shows a sample unit test to verify the greeting message. As we can see, it fetches the heading h1 element and asserts its text. By asserting that the element is h1, it offers its contribution to visual testing.

Example 5-1. Sample unit test using Jest

js
describe("Component Unit Testing", () => {
	it('displays greeting message as a default value', () => {
		expect(enzymewrapper.find("h1").text()).toContain("Good	Morning!")
	})
})

Integration/Components tests

These tests are written to validate a component’s functionality and integration between components — for example, validating the login form behavior, as seen in Example 5-2. The sample test verifies the functionality of the entire form and not just a single component as in unit testing. Integration tests usually mock the service calls and simulate UI component state changes. In Example 5-2, we have the login response mocked initially, and after a successful login, it checks for login form elements to disappear from the screen. Integration tests will also help verify components with multiple child components and integration between them in different states.

Once again, developers write these at the end of component development and maintain them inside the development codebase. They help inproviding faster feedback on the functional behavior during the development stage itself. Also, they partially contribute to visual testing — in the example, by asserting the disabled states of the elements after login. Tools like Jest, react-testing-library, etc., can be extended to do this kind of integration testing. It is also a good practice to add accessibility tests at a component level.

providing faster feedback on the functional behavior during the development stage itself. Also, they partially contribute to visual testing — in the example, by asserting the disabled states of the elements after login. Tools like Jest, react-testing-library, etc., can be extended to do this kind of integration testing. It is also a good practice to add accessibility tests at a component level.

Example 5-2. Sample integration test using Jest

js
test('User is able to login successfully', async () => {
	// Mocking Login response
	jest
	.spyOn(window, 'fetch')
	.mockResolvedValue({ json: () => ({ message: 'Success' }) });
	render(<LoginForm />);
	const emailInput = screen.getByLabelText('Email');
	const passwordInput = screen.getByLabelText('Password');
	const submit = screen.getByRole('button');
	// enter login credentials and submit
	fireEvent.change(emailInput, { target: { value: 'testUser@mail.com' } });
	fireEvent.change(passwordInput, { target: { value: 'admin123' } });
	fireEvent.click(submit);
	// submit button should be disabled immediately
	expect(submit).toBeDisabled();
	// wait for form elements to be hidden after successful login
	await waitFor(() => {
		expect(submit).not.toBeInTheDocument();
		expect(emailInput).not.toBeInTheDocument();
		expect(passwordInput).not.toBeInTheDocument();
	});
});

Snapshot Tests

Snapshot tests are intended to verify the structural aspects of individual components and component groups, contributing directly to visual testing at a micro-level. Snapshot tests render the DOM structure of the components using test renderers and compare it against an expected structure of the component, i.e., the HTML code snippet of the component is assertedagainst a base snippet. Same unit testing tools like Jest (Jest-snapshot testing support) along with react-test-renderer can be used for this purpose.

Example 5-3 shows a sample snapshot test for verifying a ‘Link’ component’s structure using Jest.

Example 5-3. Sample snapshot test using Jest

js
import React from 'react';
import renderer from 'react-test-renderer';
import Link from '../Link.react';
it('renders correctly', () => {
	const tree = renderer
	.create(<Link page="http://www.example.com">Sample Site</Link>)
	.toJSON();
	expect(tree).toMatchSnapshot();
});

For every code commit, this test will generate a new snapshot file with the DOM structure of the link component, as in Example 5-4, and verify it against the previous snapshot of the component.

js
exports[`renders correctly`] = `
	<a
		className="test"
		href="http://www.example.com"
		onMouseEnter={[Function]}
		onMouseLeave={[Function]}
	>
	Sample Site
	</a>
`;

These tests enable faster feedback on the structural aspect of the component during the development phase itself. In contrast, visual tests need the application to be fully functional on the local machine. These tests becomeimportant when components are reused across multiple applications like in design systems. Once again, they are written as part of the development process and stay within the development codebase.

Snapshot tests are recommended to focus on lower levels, such as testing a single component (a button or header) or a slightly bigger component that wouldn’t undergo frequent changes. It is better to write them after the component is developed for regression purposes. Otherwise, there is an additional effort in maintaining them even where there is a slight change in the layout.

Functional End-to-End Tests

As discussed in Chapter 3, automated functional tests mimic a real user’s actions on the website by viewing them on an actual browser. It is written to validate the complete end-to-end functional user flows while ensuring the integration between the front-end and the backend services. Unlike the above types of tests, functional tests require the application to be fully deployed and set up with appropriate test data. As mentioned earlier, though the automated functional tests use an actual browser, they only partially contribute to visual testing as it checks if the element is present based on its locator but not the entire look and feel of the element.

Visual Tests

Although all of the above types of tests partially contribute to visual testing, visual tests do the heavy lifting. Just like functional tests, as mentioned earlier, they open the application on a browser and verify the screenshot of the page against a base screenshot. Visual tests can be kept as a separate suite of tests or integrated into the functional test suite to be easier to maintain. Open source tools like Cypress, Galen, BackstopJS, etc., can be used for this purpose. You can also choose paid tools like Applitools, CrossBrowserTesting, and Percy for the same.

VISUAL VS. SNAPSHOT TESTING

Visual and snapshot tests may seem overlapping, but we can weigh them against the same benefits of writing functional end-to-end tests on a higher level and API tests on a lower level. The feedback cycle of the visual and snapshot tests varies significantly. Visual tests verify the application after it is fully rendered, just like in a browser, whereas snapshot tests give feedback on the HTML structure and hence are developer-friendly and aid shift-left testing.

Snapshot tests work well when focused on smaller individual components. But when it comes to validating the integration of multiple components in a large view, like a webpage, visual tests are ideal.

Cross-browser Testing

Cross-browser testing has to be done to fulfil two important purposes: 1. functional verification and 2. visual quality verification across browsers. Though the application’s functional flow shouldn’t change much across browsers, there have been instances where discrepancies have been noted. For example, Twitter had to fix a security incident where a user’s non- public information was stored in Firefox’s browser cache. 3 Apparently, Chrome didn’t have that issue. So testing the functional flow across browsers should be part of your cross-browser testing strategy.

As the first step to cross-browser testing, you need to decide the list of browsers you’re going to focus on. As we saw earlier, Chrome and Safari are the frequently used browsers across the globe, and users access the application from these browsers using different devices like desktops, tablets, etc. So you have to include the application’s responsiveness as a criterion when you are testing across browsers. A general rule of thumb is to focus on the browsers and resolutions that add up to 80% usage as per statistics. You can test the remaining 20% in bug bashes towards the end of release based on priority.

So to fulfill the purpose of getting functional feedback across browsers, given the caveats of UI-driven functional tests (slower feedback and doesn’t include visual testing), a good strategy might be to pick only the most critical functional flows and run them on the selected browsers. And to fulfill the purpose of getting feedback on visual quality, visual tests can be reused. They can provide feedback on both cross-browser compatibility and responsiveness. As said earlier, choose the browsers and screen sizes used by 80% of your end-users and add visual tests for the most critical user flows. Overall, have a handful of functional and visual tests (you can combine them in the same tests using Cypress, Applitools, etc.) to verify cross-browser compatibility and responsiveness of the application.

Suppose, you’re worried if these efforts will suffice the cross-browser testing needs for all application pages, a pointer to help you is that the front- end development tools/libraries like React, Vue.js, Bootstrap, Tailwind, etc., have inbuilt cross-browser support. You can rely on this for providing the visual quality of even the other non-critical user flows in the application.

Although a caveat is that these frameworks only support the standardized new browsers, some of their features may not be supported by older browsers. The information, ‘X feature of the development framework is not supported by Z browser,’ is publicly available in a tool called Caniuse, which developers can leverage to check a feature before using it manually. For example, if they want to use the UI layout flexbox in their application, they can check if their target browsers support this layout before using it. Teams can also include plugins like Stylelint-no-unsupported-browser- features to automatically check for unsupported CSS features by their target browsers based on Caniuse data. Similarly, the ESLint-plugin-CanIUse plugin helps in pointing out unsupported scripting features for your target browsers. There is also another way to provide backward compatibility of javascript code, which is to use transpilers like Babel. They convert code written in the latest javascript to a version that is compatible with older browsers. Using these provisions, you can ensure that, by default, all the pages are designed with cross-browser compatibility, especially in terms of warranting their visual quality.

SHIFTING CROSS-BROWSER TESTING TO THE LEFT

Starting from the left:

  • Use development libraries such as React, Vue.js, etc., that has support for standardized browsers.

  • Use plugins like Stylelint-no-unsupported-browser-features and tools like CanIUse to ensure the UI features are compatible with your target browsers during development.

  • Have a handful of UI-driven functional tests combined with visual tests to run on a selected set of browsers and devices that cover 80% of your application’s target usage.

  • Conduct bug bashes frequently to test as much of the remaining 20% target usage.

Front-end Performance Testing

Front-end performance testing is to check for the delay in rendering the front-end components by the browser. You can beautify the application and enhance the visual quality by adding attractive images and fancy gestures, but when performance is not great, users don’t return back to the website. Indeed, it is noted that 80% of page load time comes from front-end code. As a result, balancing front-end performance and visual quality becomes very important. The best practices in front-end performance testing and tools are discussed in detail in Chapter 8; however, mentioning it here given its relative importance.

Accessibility Testing

Web accessibility is mandated by law in many countries, and as a result, front-end code should be designed as per the WCAG 2.0 guidelines. Accessibility features significantly impact or, should I say, enhance thevisual quality as it proposes having a consistent layout throughout the website, having understandable texts, adequate clicking space, and so on.

You will learn the accessibility testing tools and best practices in Chapter 9. To summarize, the team should tailor their front-end testing strategy by understanding the intentions of the different types of tests and the need for the application. The general recommendation is to have more micro-level tests like unit tests and fewer macro-level tests like visual and end-to-end functional tests.

Perspectives: Visual Testing Challenges

One of the challenges with visual testing is choosing the automated tools itself. The above set of tools are only a sample set. With AI and SaaS providers in the game, the choices are many indeed. So, consider the following pointers while choosing automated visual testing tools:

  • Ease in workflow starting from test creation, maintenance, and CI integration.

  • Robust screenshot management techniques. If you have to replace hundreds of base images for every small change, you will pay enormous costs for visual testing. So tools that lend help in automatic clean-up and auto-update of screenshots have the upper hand.

  • Test sensitivity control where the tool can ignore small and minor UI changes.

  • Ability to handle dynamic data.

  • Ability to run across different browsers and device combinations. Performance while running visual tests across the different combinations of browsers and devices.

Apart from the choice of tools, the unspoken challenge is making your teammates fully buy the idea of automated visual testing since it adds effort to create and maintain them. But, when you create the tests in the right stages and choose the tools that provide easier tests maintenance options, your team will start appreciating the value. That said, remember that all applications don’t need automated visual testing as well. As you may recall, based on the project/business-specific use case and cost vs. value analysis, kickstart your automated visual testing efforts.