Skip to content
English
On this page

Container Images

In Linux, everything is a file. The whole operating system is basically a filesystem with files and folders stored on the local disk. This is an important fact to remember when looking at what container images are. As we will see, an image is basically a big tarball containing a filesystem. More specifically, it contains a layered filesystem.

The layered filesystem

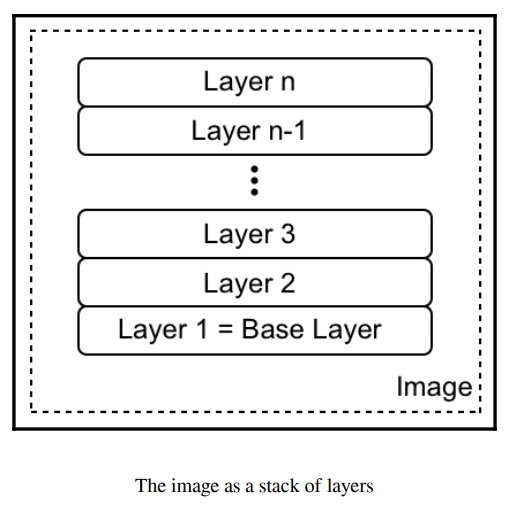
Container images are templates from which containers are created. These images are not made up of just one monolithic block but are composed of many layers. The first layer in the image is also called the base layer. We can see this in the following graphic:

layered filesystem

Each individual layer contains files and folders. Each layer only contains the changes to the filesystem with respect to the underlying layers. Docker uses a Union filesystem—as discussed in Chapter 3, Mastering Containers — to create a virtual filesystem out of the set of layers. A storage driver handles the details regarding the way these layers interact with each other. Different storage drivers are available that have advantages and disadvantages in different situations.

The layers of a container image are all immutable. Immutable means that once generated, the layer cannot ever be changed. The only possible operation affecting the layer is its physical deletion. This immutability of layers is important because it opens up a tremendous amount of opportunities, as we will see.

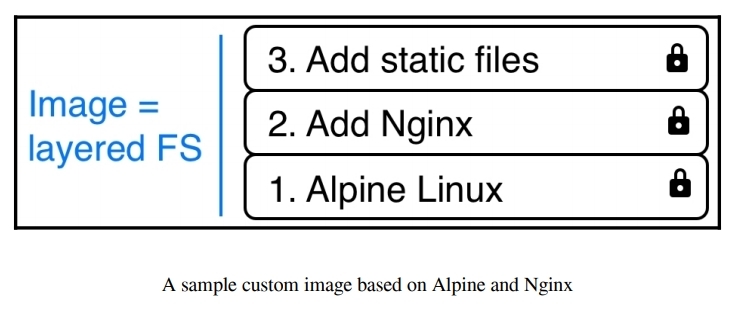
In the following screenshot, we can see what a custom image for a web application, using Nginx as a web server, could look like:

layered filesystem

Our base layer here consists of the Alpine Linux distribution. Then, on top of that, we have an Add Nginx layer where Nginx is added on top of Alpine. Finally, the third layer contains all the files that make up the web application, such as HTML, CSS, and JavaScript files.

As has been said previously, each image starts with a base image. Typically, this base image is one of the official images found on Docker Hub, such as a Linux distro, Alpine, Ubuntu, or CentOS. However, it is also possible to create an image from scratch.

Docker Hub is a public registry for container images. It is a central hub ideally suited for sharing public container images.

Each layer only contains the delta of changes in regard to the previous set of layers. The content of each layer is mapped to a special folder on the host system, which is usually a subfolder of /var/lib/docker/.

Since layers are immutable, they can be cached without ever becoming stale. This is a big advantage, as we will see.

The writable container layer

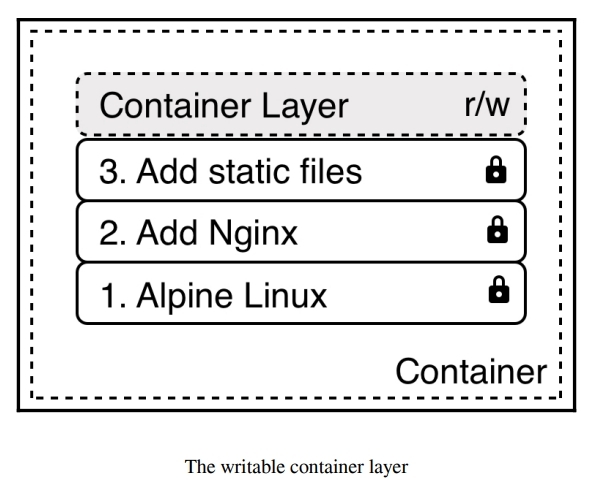
As we have discussed, a container image is made of a stack of immutable or read-only layers. When the Docker Engine creates a container from such an image, it adds a writable container layer on top of this stack of immutable layers. Our stack now looks as follows:

layered filesystem

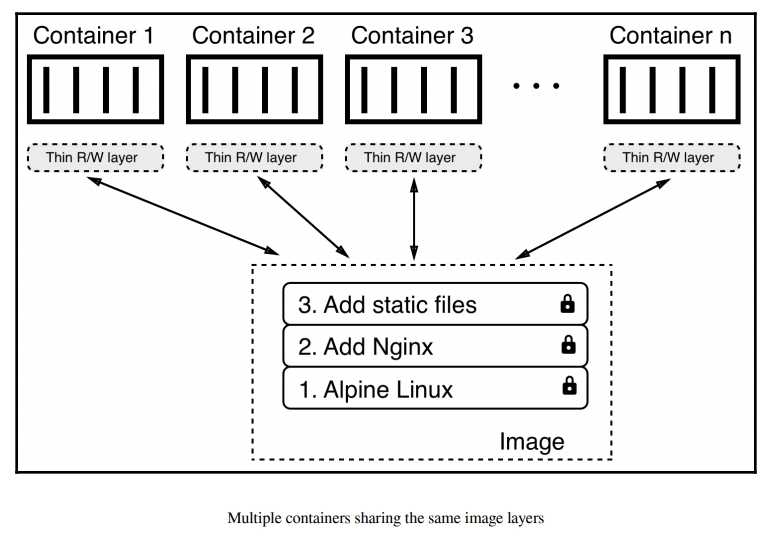
The Container Layer is marked as read/write. Another advantage of the immutability of image layers is that they can be shared among many containers created from this image. All that is needed is a thin, writable container layer for each container, as shown in the following screenshot:

layered filesystem

This technique, of course, results in a tremendous reduction in the resources that are consumed. Furthermore, this helps to decrease the loading time of a container since only a thin container layer has to be created once the image layers have been loaded into memory, which only happens for the first container.

Copy-on-write

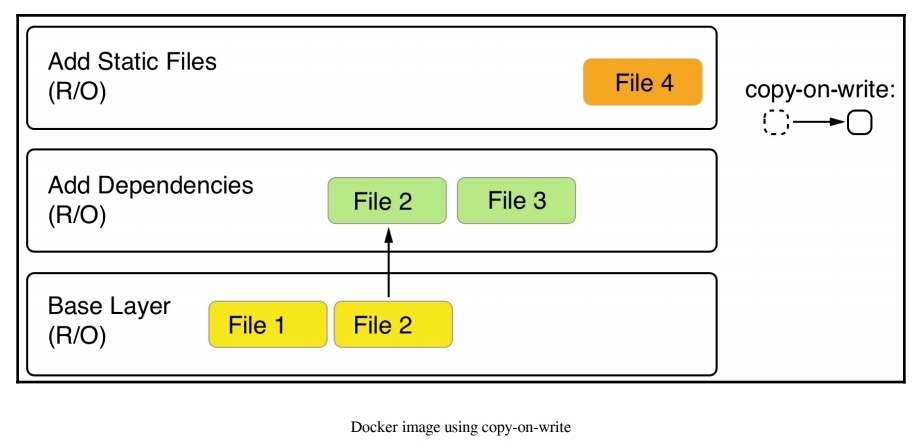
Docker uses the copy-on-write technique when dealing with images. Copy-on-write is a strategy for sharing and copying files for maximum efficiency. If a layer uses a file or folder that is available in one of the low-lying layers, then it just uses it. If, on the other hand, a layer wants to modify, say, a file from a low-lying layer, then it first copies this file up to the target layer and then modifies it. In the following screenshot, we can see a glimpse of what this means:

layered filesystem

The second layer wants to modify File 2, which is present in the Base Layer. Thus, it copies it up and then modifies it. Now, let's say that we're sitting in the top layer of the preceding screenshot. This layer will use File 1 from the Base Layer and File 2 and File 3 from the second layer.

Graph drivers

Graph drivers are what enable the Union filesystem. Graph drivers are also called storage drivers and are used when dealing with layered container images. A graph driver consolidates multiple image layers into a root filesystem for the mount namespace of the container. Or, put differently, the driver controls how images and containers are stored and managed on the Docker host.

Docker supports several different graph drivers using a pluggable architecture. The preferred driver is overlay2, followed by overlay.

Creating images

There are three ways to create a new container image on your system. The first one is by interactively building a container that contains all the additions and changes one desires, and then committing those changes into a new image. The second, and most important, way is to use a Dockerfile to describe what's in the new image, and then build the image using that Dockerfile as a manifest. Finally, the third way of creating an image is by importing it into the system from a tarball.

Now, let's look at these three ways in detail.

Using Dockerfiles

Manually creating custom images, as shown in the previous section of this chapter, is very helpful when doing exploration, creating prototypes, or authoring feasibility studies. But it has a serious drawback: it is a manual process and thus is not repeatable or scalable. It is also as error-prone as any other task executed manually by humans. There must be a better way.

This is where the so-called Dockerfile comes into play. A Dockerfile is a text file that is usually literally called Dockerfile. It contains instructions on how to build a custom container image. It is a declarative way of building images.

Declarative versus imperative: In computer science, in general, and with Docker specifically, one often uses a declarative way of defining a task. One describes the expected outcome and lets the system figure out how to achieve this goal, rather than giving step-by-step instructions to the system on how to achieve this desired outcome. The latter is an imperative approach.

Let's look at a sample Dockerfile, as follows:

FROM python:2.7
RUN mkdir -p /app
WORKDIR /app
COPY ./requirements.txt /app/
RUN pip install -r requirements.txt
CMD ["python", "main.py"]

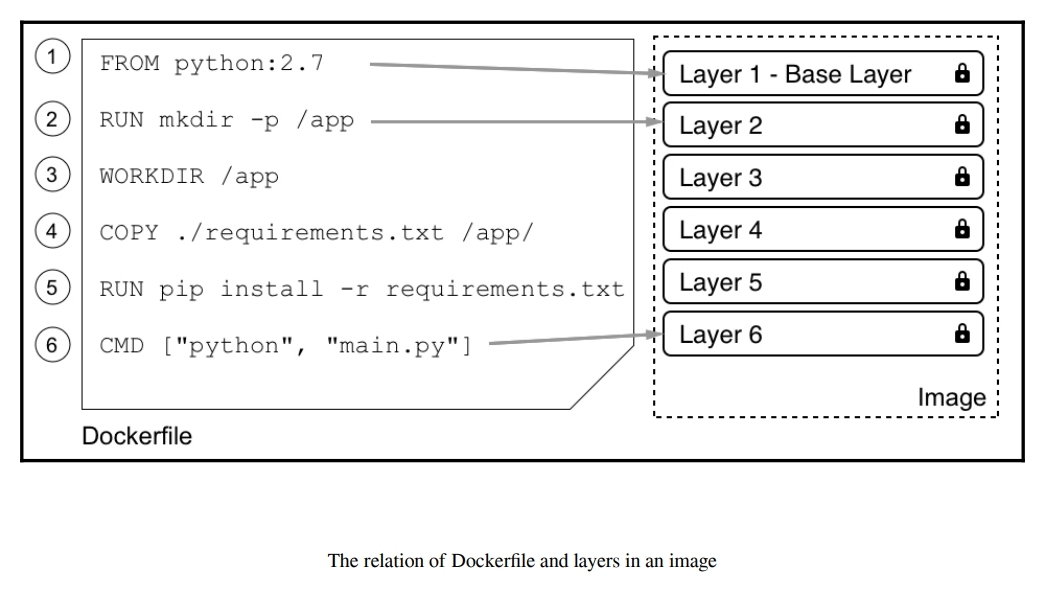
This is a Dockerfile as it is used to containerize a Python 2.7 application. As we can see, the file has six lines, each starting with a keyword such as FROM, RUN, or COPY. It is a convention to write the keywords in all caps, but that is not a must.

Each line of the Dockerfile results in a layer in the resulting image. In the following screenshot, the image is drawn upside down compared to the previous illustrations in this chapter, showing an image as a stack of layers. Here, the Base Layer is shown on top. Don't let yourself be confused by this. In reality, the base layer is always the lowest layer in the stack:

layered filesystem

The FROM keyword

Every Dockerfile starts with the FROM keyword. With it, we define which base image we want to start building our custom image from. If we want to build starting with CentOS 7, for example, we would have the following line in the Dockerfile:

FROM centos:7

On Docker Hub, there are curated or official images for all major Linux distros, as well as for all important development frameworks or languages, such as Python, Node.js, Ruby, Go, and many more. Depending on our needs, we should select the most appropriate base image.

For example, if I want to containerize a Python 3.7 application, I might want to select the relevant official python:3.7 image.

If we really want to start from scratch, we can also use the following statement:

FROM scratch

This is useful in the context of building super-minimal images that only—for example—contain a single binary: the actual statically linked executable, such as HelloWorld. The scratch image is literally an empty base image.

FROM scratch is a no-op in the Dockerfile, and as such does not generate a layer in the resulting container image.

The RUN keyword

The next important keyword is RUN. The argument for RUN is any valid Linux command, such as the following:

RUN yum install -y wget

The preceding command is using the yum CentOS package manager to install the wget package into the running container. This assumes that our base image is CentOS or Red Hat Enterprise Linux (RHEL). If we had Ubuntu as our base image, then the command would look similar to the following:

RUN apt-get update && apt-get install -y wget

It would look like this because Ubuntu uses apt-get as a package manager. Similarly, we could define a line with RUN, like this:

RUN mkdir -p /app && cd /app

We could also do this:

RUN tar -xJC /usr/src/python --strip-components=1 -f python.tar.xz

Here, the former creates an /app folder in the container and navigates to it, and the latter untars a file to a given location. It is completely fine, and even recommended, for you to format a Linux command using more than one physical line, such as this:

RUN apt-get update \
 && apt-get install -y --no-install-recommends \
 ca-certificates \
 libexpat1 \
 libffi6 \
 libgdbm3 \
 libreadline7 \
 libsqlite3-0 \
 libssl1.1 \
 && rm -rf /var/lib/apt/lists/*

If we use more than one line, we need to put a backslash () at the end of the lines to indicate to the shell that the command continues on the next line.

Try to find out what the preceding command does.

The COPY and ADD keywords

The COPY and ADD keywords are very important since, in the end, we want to add some content to an existing base image to make it a custom image. Most of the time, these are a few source files of—say—a web application, or a few binaries of a compiled application.

These two keywords are used to copy files and folders from the host into the image that we're building. The two keywords are very similar, with the exception that the ADD keyword also lets us copy and unpack TAR files, as well as providing a URL as a source for the files and folders to copy.

Let's look at a few examples of how these two keywords can be used, as follows:

COPY . /app
COPY ./web /app/web
COPY sample.txt /data/my-sample.txt
ADD sample.tar /app/bin/
ADD http://example.com/sample.txt /data/

In the preceding lines of code, the following applies:

  • The first line copies all files and folders from the current directory recursively to the app folder inside the container image.

  • The second line copies everything in the web subfolder to the target folder, /app/web.

  • The third line copies a single file, sample.txt, into the target folder, /data, and at the same time, renames it to my-sample.txt.

  • The fourth statement unpacks the sample.tar file into the target folder, /app/bin .

  • Finally, the last statement copies the remote file, sample.txt, into the target file, /data.

Wildcards are allowed in the source path. For example, the following statement copies all files starting with sample to the mydir folder inside the image:

COPY ./sample* /mydir/

From a security perspective, it is important to know that, by default, all files and folders inside the image will have a user ID (UID) and a group ID (GID) of 0. The good thing is that for both ADD and COPY, we can change the ownership that the files will have inside the image using the optional --chown flag, as follows:

ADD --chown=11:22 ./data/web* /app/data/

The preceding statement will copy all files starting with the name web and put them into the /app/data folder in the image, and at the same time assign user 11 and group 22 to these files.

Instead of numbers, one could also use names for the user and group, but then these entities would have to be already defined in the root filesystem of the image at /etc/passwd and /etc/group respectively; otherwise, the build of the image would fail.

The WORKDIR keyword

The WORKDIR keyword defines the working directory or context that is used when a container is run from our custom image. So, if I want to set the context to the /app/bin folder inside the image, my expression in the Dockerfile would have to look as follows:

WORKDIR /app/bin

All activity that happens inside the image after the preceding line will use this directory as the working directory. It is very important to note that the following two snippets from a Dockerfile are not the same:

RUN cd /app/bin
RUN touch sample.txt

Compare the preceding code with the following code:

WORKDIR /app/bin
RUN touch sample.txt

The former will create the file in the root of the image filesystem, while the latter will create the file at the expected location in the /app/bin folder. Only the WORKDIR keyword sets the context across the layers of the image. The cd command alone is not persisted across layers.

The CMD and ENTRYPOINT keywords

The CMD and ENTRYPOINT keywords are special. While all other keywords defined for a Dockerfile are executed at the time the image is built by the Docker builder, these two are actually definitions of what will happen when a container is started from the image we define. When the container runtime starts a container, it needs to know what the process or application will be that has to run inside that container. That is exactly what CMD and ENTRYPOINT are used for—to tell Docker what the start process is and how to start that process.

Now, the differences between CMD and ENTRYPOINT are subtle, and honestly, most users don't fully understand them or use them in the intended way. Luckily, in most cases, this is not a problem and the container will run anyway; it's just the handling of it that is not as straightforward as it could be.

To better understand how to use the two keywords, let's analyze what a typical Linux command or expression looks like. Let's take the ping utility as an example, as follows:

$ ping -c 3 8.8.8.8

In the preceding expression, ping is the command and -c 3 8.8.8.8 are the parameters to this command. Let's look at another expression here:

$ wget -O - http://example.com/downloads/script.sh

Again, in the preceding expression, wget is the command and -O - http://example.com/downloads/script.sh are the parameters.

Now that we have dealt with this, we can get back to CMD and ENTRYPOINT. ENTRYPOINT is used to define the command of the expression, while CMD is used to define the parameters for the command. Thus, a Dockerfile using Alpine as the base image and defining ping as the process to run in the container could look like this:

FROM alpine:3.10
ENTRYPOINT ["ping"]
CMD ["-c","3","8.8.8.8"]

For both ENTRYPOINT and CMD, the values are formatted as a JSON array of strings, where the individual items correspond to the tokens of the expression that are separated by whitespace. This is the preferred way of defining CMD and ENTRYPOINT. It is also called the exec form.

Alternatively, one can also use what's called the shell form, as shown here:

CMD command param1 param2

We can now build an image called pinger from the preceding Dockerfile, as follows:

$ docker image build -t pinger .

Then, we can run a container from the pinger image we just created, like this:

$ docker container run --rm -it pinger
PING 8.8.8.8 (8.8.8.8): 56 data bytes
64 bytes from 8.8.8.8: seq=0 ttl=37 time=19.298 ms
64 bytes from 8.8.8.8: seq=1 ttl=37 time=27.890 ms
64 bytes from 8.8.8.8: seq=2 ttl=37 time=30.702 ms

The beauty of this is that I can now override the CMD part that I have defined in the Dockerfile (remember, it was ["-c", "3","8.8.8.8"]) when I create a new container by adding the new values at the end of the docker container run expression, like this:

$ docker container run --rm -it pinger -w 5 127.0.0.1

If we want to override what's defined in the ENTRYPOINT in the Dockerfile, we need to use the --entrypoint parameter in the docker container run expression. Let's say we want to execute a shell in the container instead of the ping command. We could do so by using the following command:

$ docker container run --rm -it --entrypoint /bin/sh pinger

We will then find ourselves inside the container. Type exit to leave the container. As I already mentioned, we do not necessarily have to follow best practices and define the command through ENTRYPOINT and the parameters through CMD; we can instead enter the whole expression as a value of CMD and it will work, as shown in the following code block:

FROM alpine:3.10
CMD wget -O - http://www.google.com

Here, I have even used the shell form to define the CMD. But what does really happen in this situation where ENTRYPOINT is undefined? If you leave ENTRYPOINT undefined, then it will have the default value of /bin/sh -c, and whatever the value of CMD is will be passed as a string to the shell command. The preceding definition would thereby result in entering the following code to run the process inside the container:

/bin/sh -c "wget -O - http://www.google.com"

Consequently, /bin/sh is the main process running inside the container, and it will start a new child process to run the wget utility.

Dockerfile best practices

There are a few recommended best practices to consider when authoring a Dockerfile,which are as follows:

  • First and foremost, we need to consider that containers are meant to be ephemeral. By ephemeral, we mean that a container can be stopped and destroyed, and a new one built and put in place with an absolute minimum of setup and configuration. That means that we should try hard to keep the time that is needed to initialize the application running inside the container at a minimum, as well as the time needed to terminate or clean up the application.

  • The next best practice tells us that we should order the individual commands in the Dockerfile so that we leverage caching as much as possible. Building a layer of an image can take a considerable amount of time—sometimes many seconds, or even minutes. While developing an application, we will have to build the container image for our application multiple times. We want to keep the build times at a minimum.

When we're rebuilding a previously built image, the only layers that are rebuilt are the ones that have changed, but if one layer needs to be rebuilt, all subsequent layers also need to be rebuilt. This is very important to remember. Consider the following example:

FROM node:9.4
RUN mkdir -p /app
WORKIR /app
COPY . /app
RUN npm install
CMD ["npm", "start"]

In this example, the npm install command on line five of the Dockerfile usually takes the longest. A classical Node.js application has many external dependencies, and those are all downloaded and installed in this step. This can take minutes until it is done. Therefore, we want to avoid running npm install each time we rebuild the image, but a developer changes their source code all the time during the development of an application. That means that line four, the result of the COPY command, changes every time, and thus this layer has to be rebuilt. But as we discussed previously, that also means that all subsequent layers have to be rebuilt, which—in this case—includes the npm install command. To avoid this, we can slightly modify the Dockerfile and have the following:

FROM node:9.4
RUN mkdir -p /app
WORKIR /app
COPY package.json /app/
RUN npm install
COPY . /app
CMD ["npm", "start"]

What we have done here is, on line four, we only copied the single file that the npm install command needs as a source, which is the package.json file. This file rarely changes in a typical development process. As a consequence, the npm install command also has to be executed only when the package.json file changes. All the remaining, frequently changed content is added to the image after the npm install command.

  • A further best practice is to keep the number of layers that make up your image relatively small. The more layers an image has, the more the graph driver needs to work to consolidate the layers into a single root filesystem for the corresponding container. Of course, this takes time, and thus the fewer layers an image has, the faster the startup time for the container can be.

But how can we keep our number of layers low? Remember that in a Dockerfile, each line that starts with a keyword such as FROM, COPY, or RUN creates a new layer. The easiest way to reduce the number of layers is to combine multiple individual RUN commands into a single one. For example, say that we had the following in a Dockerfile:

RUN apt-get update
RUN apt-get install -y ca-certificates
RUN rm -rf /var/lib/apt/lists/*

We could combine these into a single concatenated expression, as follows:

RUN apt-get update \
 && apt-get install -y ca-certificates \
 && rm -rf /var/lib/apt/lists/*

The former will generate three layers in the resulting image, while the latter only creates a single layer. The next three best practices all result in smaller images. Why is this important? Smaller images reduce the time and bandwidth needed to download the image from a registry. They also reduce the amount of disk space needed to store a copy locally on the Docker host and the memory needed to load the image. Finally, smaller images also mean a smaller attack surface for hackers. Here are the best practices mentioned:

The first best practice that helps to reduce the image size is to use a .dockerignore file. We want to avoid copying unnecessary files and folders into an image, to keep it as lean as possible. A .dockerignore file works in exactly the same way as a .gitignore file, for those who are familiar with Git.

  • In a .dockerignore file, we can configure patterns to exclude certain files or folders from being included in the context when building the image.

  • The next best practice is to avoid installing unnecessary packages into the filesystem of the image. Once again, this is to keep the image as lean as possible.

  • Last but not least, it is recommended that you use multi-stage builds so that the resulting image is as small as possible and only contains the absolute minimum needed to run your application or application service.

Sharing or shipping images

To be able to ship our custom image to other environments, we need to first give it a globally unique name. This action is often called tagging an image. We then need to publish the image to a central location from which other interested or entitled parties can pull it. These central locations are called image registries.

Tagging an image

Each image has a so-called tag. A tag is often used to version images, but it has a broader reach than just being a version number. If we do not explicitly specify a tag when working with images, then Docker automatically assumes we're referring to the latest tag. This is relevant when pulling an image from Docker Hub, as in the following example:

$ docker image pull alpine

The preceding command will pull the alpine:latest image from Docker Hub. If we want to explicitly specify a tag, we do so like this:

$ docker image pull alpine:3.5

This will now pull the alpine image that has been tagged with 3.5.

Image namespaces

So far, we have been pulling various images and haven't been worrying so much about where those images originated from. Your Docker environment is configured so that, by default, all images are pulled from Docker Hub. We also only pulled so-called official images from Docker Hub, such as alpine or busybox.

Now, it is time to widen our horizon a bit and learn about how images are namespaced. The most generic way to define an image is by its fully qualified name, which looks as follows:

<registry URL>/<User or Org>/<name>:<tag>

Let's look at this in a bit more detail:

<registry URL>: This is the URL to the registry from which we want to pull the image. By default, this is docker.io. More generally, this could be https://registry.acme.com. Other than Docker Hub, there are quite a few public registries out there that you could pull images from. The following is a list of some of them, in no particular order:

<User or Org> : This is the private Docker ID of either an individual or an organization defined on Docker Hub—or any other registry, for that matter—such as microsoft or oracle.

<name>: This is the name of the image, which is often also called a repository.

<tag>: This is the tag of the image.

Let's look at an example, as follows:

https://registry.acme.com/engineering/web-app:1.0

Here, we have an image, web-app, that is tagged with version 1.0 and belongs to the engineering organization on the private registry at https://registry.acme.com

Now, there are some special conventions:

  • If we omit the registry URL, then Docker Hub is automatically taken.
  • If we omit the tag, then latest is taken.
  • If it is an official image on Docker Hub, then no user or organization namespace is needed.

Here are a few samples in tabular form:

ImageDescription
alpineOfficial alpine image on Docker Hub with the latest tag.
ubuntu:19.04Official ubuntu image on Docker Hub with the 19.04 tag or version.
microsoft/nanoservernanoserver image of Microsoft on Docker Hub with the latest tag.
acme/web-api:12.0web-api image version 12.0 associated with the acme org. The image is on Docker Hub.
gcr.io/gnschenker/sample-app:1.1sample-app image with the 1.1 tag belonging to an individual with the gnschenker ID on Google's container registry.

Now that we know how the fully qualified name of a Docker image is defined and what its parts are, let's talk about some special images we can find on Docker Hub.

Official images

In the preceding table, we mentioned official image a few times. This needs an explanation. Images are stored in repositories on the Docker Hub registry. Official repositories are a set of repositories hosted on Docker Hub that are curated by individuals or organizations that are also responsible for the software packaged inside the image. Let's look at an example of what that means. There is an official organization behind the Ubuntu Linux distro. This team also provides official versions of Docker images that contain their Ubuntu distros. Official images are meant to provide essential base OS repositories, images for popular programming language runtimes, frequently used data storage, and other important services.

Docker sponsors a team whose task it is to review and publish all those curated images in public repositories on Docker Hub. Furthermore, Docker scans all official images for vulnerabilities.

Pushing images to a registry

Creating custom images is all well and good, but at some point, we want to actually share or ship our images to a target environment, such as a test, quality assurance (QA), or production system. For this, we typically use a container registry. One of the most popular and public registries out there is Docker Hub. It is configured as a default registry in your Docker environment, and it is the registry from which we have pulled all our images so far.

On a registry, one can usually create personal or organizational accounts. For example, my personal account at Docker Hub is gnschenker. Personal accounts are good for personal use. If we want to use the registry professionally, then we'll probably want to create an organizational account, such as acme, on Docker Hub. The advantage of the latter is that organizations can have multiple teams. Teams can have differing permissions.

To be able to push an image to my personal account on Docker Hub, I need to tag it accordingly:

  1. Let's say I want to push the latest version of Alpine to my account and give it a tag of 1.0. I can do this in the following way:

$ docker image tag alpine:latest gnschenker/alpine:1.0

  1. Now, to be able to push the image, I have to log in to my account, as follows:

$ docker login -u gnschenker -p <my secret password>

  1. After a successful login, I can then push the image, like this:

$ docker image push gnschenker/alpine:1.0

I will see something similar to this in the Terminal:

The push refers to repository [docker.io/gnschenker/alpine]
04a094fe844e: Mounted from library/alpine
1.0: digest: sha256:5cb04fce... size: 528

For each image that we push to Docker Hub, we automatically create a repository. A repository can be private or public. Everyone can pull an image from a public repository. From a private repository, an image can only be pulled if one is logged in to the registry and has the necessary permissions configured.